
So I got a couple of games in this weekend. I played a fellow I've never played before and his mech IG list. I played my Dread/Crowe list, as you might expect.
My opponent had the following...
1 CCS with 3x melta in Chimera
2 Veteran Squads with 3x Melta in Chimera
Heavy weapon squad with 2x missiles, 1x Autocannon
Infantry blob with 2x autocannon team
3x Medusa
1x Vendetta with melta vets
1x Vendetta with flamer/demo charge vets
1x Valkyrie with melta vets
I could be off a bit on some of that stuff, but that was the meat of it.
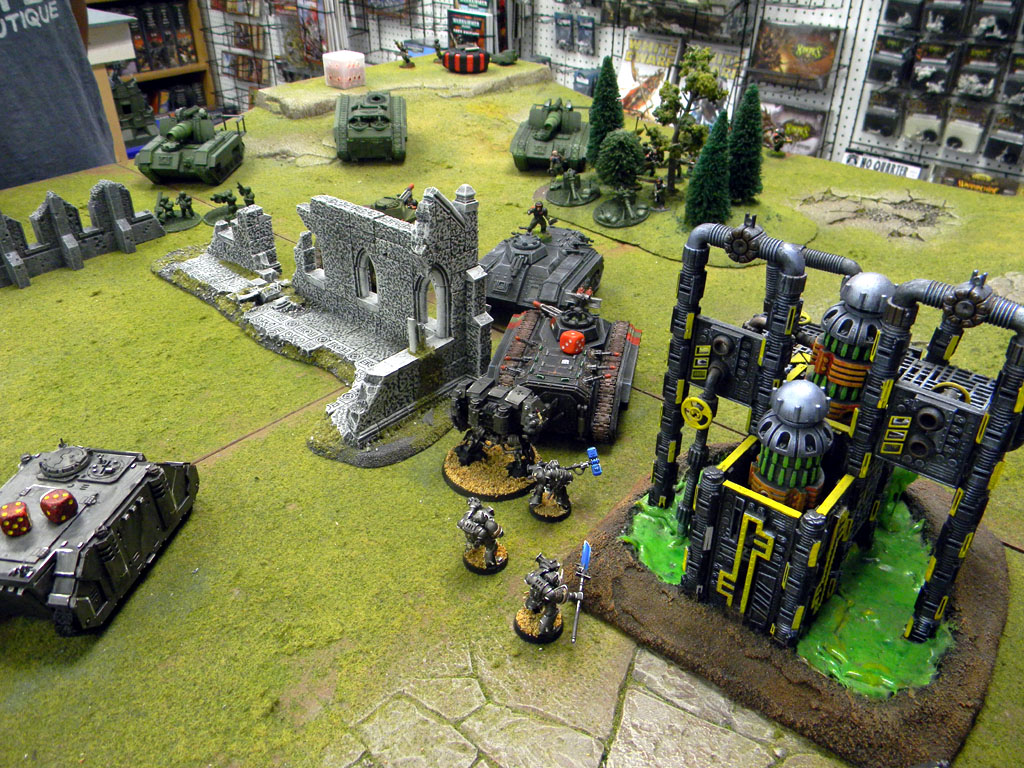
We rolled Capture and Control (ugh) and spear head. I got the first turn and deployed like so.

You can see the only thing that would be exposed to fire if he seized would be the leading two Rhinos. Everything else would be hull down.
He deployed like so...

Not a bad deployment, everything had cover turn 1. He kept his Storm Troopers in reserve deep striking, and his 3 Birds outflanking.
Grey Knights Turn 1.
I moved up. Lead Rhinos went 12 and popped smoke. Everything else moved 6" to get cover and shots.
My shooting shook a Chimera and a Medusa and otherwise did nothing. Turn over.
 |
| End GK Turn 1 |
Imperial Guard Turn 1
He moved a Chimera up, dumped out some Melta vets infront of my lead Rhino. Everything else stood more or less still.
His vets blew away the Rhino, and killed 3 Purifiers in the explosion. However, the explosion also killed like 3 or 4 of the Vets. The rest of his shooting immobilized and weapon destroyed the other Rhino, but it was comfortably parking in the midfield so I wasn't too unhappy with it being a bunker.
 |
| End IG Turn 1 |
Grey Knights Turn 2
Ven Dread and the surviving Purifiers moved up to shoot/assault the melta vets. Crowe came on and walked/ran next to my objective.
In shooting, I wrecked a Medusa, shook the other two, and immobilized one of them. I also wrecked the Chimera containing his CCS who disembarked behind it in cover.
In combat, I smushed the melta vets and consolidated up near his Chimera.
 |
| End GK Turn 2 |
Imperial Guard Turn 2
All three of his Birds came on, but Storm Troopers did not. He brought the Vendetta and Valk on behind my dreads for shots at the rear armor of the Pysflemen. The other vendetta came on the far board edge by his deployment zone. The Valkyrie's squad disembarked after the Valk moved on 12".
Shooting was great for me, relatively speaking. His melta vets fired 3 melta shots and only immobilized one of the dreads. The Vendetta fired 3 TLLC and managed to blow off an arm of another. Both were also Shaken, but I Fortituded those away on my turn. The Ven Dread near my Purifiers got blow away by the his Vendetta. And my other lead Rhino got blown up by the Heavy Weapons teams, forcing out the Purfiers. The other Ven Dread was immobilized.
 |
| End IG Turn 2 |
Grey Knights Turn 3
Crowe moved up to charge the Melta vets who came out of the Valkyrie. The Purifiers on my left moved closer to the HWT and CCS. The Purifiers' Rhino on my far right moved up 12" closer to the Vendetta and popped smoke. The two remaining Purifiers I had in the middle moved up to charge the melta vets.
In Shooting I shook the Valkyrie, The Psyflemen turned around and exploded the Vendetta in my back lines, killing enough of the vets inside to cause morale and for them to run off the board. The other Pysfleman killed his last Medusa. I was very happy to have those Medusa silenced. AP2 large blasts scare Purifiers.
In combat my two remaining Purifiers sucked big time against his vets, failing their Cleansing Flame roll, and only doing 3 wounds. He somehow managed to do two wounds to them, which they promptly failed. Crowe managed to kill 5 of the vets in close combat, despite failing his Cleansing flame roll, too. They miraculously held on and moved around him for another turn of beatings.
 |
| End GK Turn 3 |
IG Turn 3
His Storm Troopers again failed to appear.
His Valk headed for the hills, moving 24" to the far side of the building in the center. The rest of his force stayed still and shot.
His Vendetta popped the Rhino on my far right forcing out the Purifiers, who would be close enough to charge it on my turn. He may have done a casualty or two to my far left Purifiers, but nothing major.
In Combat, Crowe killed and chased down the Vets and consolidated back towards the objective.
All in all, a good turn for me, as he did minimal casualties.
 |
| End IG Turn 3 |
Grey Knights Turn 4
I moved my left Purifiers up for a charge on his CCS. My right Purifiers moved up to shoot/assault his Vendetta. My still intact Rhino with Purifiers moved back 6" towards my objective as I had no troops holding it.
In shooting, my right Purifiers didn't do much to his Vendetta, but one of my Psyflemen blew off two of it's lascannons. The other Pysflement did an Instant Death wound to one of his HWT dudes. My immobiled Ven dread melta'ed his empty Chimera in the midfield.
In combat with the Vendetta, despite casting hammer hands and hitting with two hammers, all I managed to do was immobilize the Vendetta. I was hoping to blow it up so the vets inside would take some casualties, but as it was, it was surrounded enough that they couldn't deploy. On the left, I butchered his CCS and forced them to run, but the HWT who I multi-charged held and I was stuck in with them.
 |
| End GK Turn 4 |
IG Turn 4
The CCS continued to flee. The Storm Troopers came in next to my Purifiers that were surrounding his Vendetta. His Valk moved around to get shots at my still intact Rhino if it lived to the next turn.
His hotshot lasguns predictable did nothing, killing a single Purifier I think. The HWT in his blob popped my intact Rhino and forced out the dudes, who were now close enough to my objective to claim it. He killed my other Ven Dread with his Valk.
In combat, my Purifiers killed the last of his HWT and consolidated towards his blob, and his objective.
 |
| End IG Turn 4. Note my Purifiers moving at his blob and the others about to fillet the Storm Troopers. |
Grey Knights Turn 5.
My rear Purifiers and Psyflemen moved to claim, guard the objective to keep the Valk from trying any shenanigans. The right Purifiers moved 1" away from the Storm Troopers to unleash hell on them. The two surviving Purifiers on my left moved to charge the blob.
In shooting I don't remember why, but my Psyflemen didn't manage to hurt his Valk, I don't recall what shots they took this turn. My Purifiers did some shooting casualties to his Storm Troopers.
I charged the Storm Troopers and the blob. The Troopers got massacred by the team thanks to Hammerhand, and I consolidated a whopping inch towards his blob's command squad, who had a flamer. The Cleansing Flame from my two man squad killed a massive 9 of his blob. Their actual attacks killed 2. They failed to do any wounds back. They fled and I consolidated towards the objective.
 |
| End GK Turn 5. The view from my back line objective, nice and secure. |
 | ||
| End GK Turn 5 the view of my two units moving towards his objective. |
IG Turn 5.
His Demo charge/flamer vets came out of the immobilized Vendetta towards the nearby Purifier squad. I was worried, because a flamer and two demo charges should be enough to kill 6 Purifiers. His former blob's command squad moved up to also flame those Purifiers.
In his shooting, the two demo charges and two flamers managed to kill 6 of the Purifiers. Leaving me with two squads of 2 Purifiers still near his backlines. Nonetheless, if we rolled a 1 or a 2 the game would be a draw.
We rolled a 5 and the game continued to 6. I think I forgot to take a picture of the board this turn.
Grey Knights Turn 6
Basically, my 2 squads of two charged his blob command squad and killed them, losing one Purifier in return. They both consolidated towards the objective claiming it. He realized that he didn't have a way to kill both squads on his turn and claim the objective himself, so he extended his hand. A rare win on Capture and Control for the Grey Knights!
 |
| End GK Turn 6. The IG from the former blob command squad aren't there, this is right before he removed casualties and I consolidated. His demo vets would only have lasguns in range on his turn, and can't kill two separate units, so there was neither a way for him to clear that objective, nor did he have any troops of his own to claim it. |
All in all a hard fought game. It really came down to my ability to shake his Medusa every turn after turn 1 and then have them all destroyed early. That kind of firepower could be deadly to me if left unchecked. Also huge was his two outflanking Birds coming into my backlines and totally failing to silence my Psyflemen. Two meltavet squads and two gunships that were killed or silenced without doing any meaningful damage was a big chunk of his list gone without achieving anything and my fire support never ceasing.
MVP of the match was probably either the Psyflemen who killed a ton of stuff, but really it was the Purifiers being Fearless. I don't know if I would have failed the leadership tests, but the fact that the ones pushing into his backlines towards his objectives took heavy damage and never even had to test was enormous. Being fearless allowed me to know that so long as a single man from the unit lived I could still win the game, and unless his shooting killed them entirely, it was inevitable.
Yeah, in my playtesting against the GK...Purifiers being fearless has been huge. Definitely not a fan of that. ;)
ReplyDeleteNice report, that's the kind of IG list I'm afraid of playing against with my Dark Eldar. You did well though against all that AV12. The whole time I was thinking "man, it's awesome that Purifiers are fearless, or at least one squad would have fled/been pinned by now!
ReplyDeleteKeep it up, I'm enjoying the reports. Gotta see what the GKs can do!
well said conclusion... this is a fierce IG list, I didnt anticipate you surviving it, much less coming away with a win. well played
ReplyDeleteActually the list was more like:
ReplyDeleteCompany command
4 melta guns Chimera w/ H/f
10 Veterans
3 meltas demo charge
in Chimera w/ H/f
10 veterans
3 meltas demo charge
in Chimera w/ H/f
10 veterans
3 meltas
Infantry Platoon
Platoon Command
1 flamer
2 infantry squads (blobbed)
2 autocannons
Special weapons squad
2 demo charges 1 flamer
Special weapon squad
2 demo charges 1 flamer
Heavy weapons team
1 missle launcher 2 autocannons
Vendetta
Vendetta
Valkerie
medusa
medusa
medusa
8 man storm trooper w/ 2 meltaguns
(note the 2 demo teams go in vendettas and the 1 melta vet squad goes in valk)
I believe that was my list. Its not exactly what I wanted but I used what I have models for. No excuses here Nike played a solid game. tactical blunders and bad rolling for from my valks lost me the game. Biggest Blunder was probably forgetting my stormtroopers to roll to come in on one turn. I normally dont play with storm troopers as I think they are a waste (too many points for what they do). My main plan was to put my chimera with veterans between the 2 pieces of terrain and blow up his transports. The idea here was to delay him from getting at my objectives by plugging the holes of terrain with vehicles and providing them cover. This was definitely a fun game and Nike is a fantastic General. I do have to apologize for some of my movement turns taking to long and thinking of positioning. There were some crazy good dice rolling and some really bad. At one point In the game Nike fired at a vet squad with 3 guys left that was not in cover went to ground and I rolled 3 6's and all of them lived. Anyways fun game looking forward to a rematch!